Showing posts with label Family recipes. Show all posts

Tuesday, May 28, 2013

Cherry coconut porridge

I have yet to find my rhythm. 
As someone who likes to know how the movie ends before seeing it, and who takes joy in creating routines and organising, my current completely random and spontaneous days make me feel as though my head is spinning. My daughter, bless her, is a very irregular kid; trying to mould her into a schedule is like trying to shape dry sand - frustratingly difficult. 
Because I can never truly know what to expect on any given day, things like blogging have once again become luxuries that I can barely scrounge up enough time for. So, once again, this will be the last post for now. 

However, I still manage to post daily on my Instagram account. So feel free to follow that :)  - http://instagram.com/greedygourmand


Cherry coconut porridge

1.5cups oats
4 tablespoons chia seed
3-4cups of coconut drinking milk
3 tablepoons raw cacao
pinch of stevia
coconut shavings
cherries (fresh or frozen)
dark chocolate shavings
maple syrup

Combine oats, chia, coconut milk, cacao and stevia in a saucepan. Bring to a boil over medium heat and then simmer over lower heat until oats are cooked.
Pour into a bowl and top with coconut shavings, cherries, dark chocolate shavings and maple syrup to taste.


Wednesday, September 19, 2012

A Valentine's Day Party and an announcement...

All good things come to an end...

The squeak of a swing in use, the pitter patter of tiny feet and the tinkling of children's laughter surrounded me. Red, pink and white balloons hung from the room like garlands and paper hearts adorned the walls.
It was my daughter's first birthday party.

The theme was Valentine's Day and cheesy love songs wafted through the speakers whilst children played pin the heart on the cupid and hunted for hidden hearts amongst the playground. We were blessed with an abundance of sunshine, so the hall we had hired and decorated held only a few guests with the majority of them enjoying the surrounding park lands. I spent months planning and preparing, but on the day the little one decided to sleep during my decoration time, so I gave instructions to my husband and hoped for the best as I stayed at home with my sleeping beauty. I have to say, although it didn't turn out exactly as I had envisioned, he did a spectacular job bringing her birthday to life.

We had a whopping 70 guests (the husband assured me that most people wouldn't come, only two were unable to make it), so needless to say I was rather busy attending to everyone, organising games and ensuring there was enough food, all with a 10kg toddler on my hip (as I expected, Miss V was a little overwhelmed by all the people and only wanted to be held by mummy). Whilst it was wonderful seeing everyone, next year will definitely be a more intimate affair. I didn't take any photos of the day myself, but luckily I have a few snap-happy friends who did, so I'll share a few with you.

The children's dessert table included:
  • red apples
  • fresh strawberries
  • home made strawberry and apple juice
  • coconut and mixed berry yoghurt
  • gingerbread men
  • mini vanilla cupcakes
  • and the birthday cake which was a strawberry and white chocolate mud swirl

Valentine's favourite part of the day was when daddy pushed her on the swing. And of course later at home when she got to rip open all of those gifts :). 

This year has brought a lot of change and new experiences for me. And I must admit, that before my daughter came along, I ignorantly assumed that I could just 'fit her in' to my life without having to change much. Boy, was my head up in the clouds. As it turns out, young kids aren't very fond of fine dining or long days at the beach or large events etc. What they do want is PLENTY of time with mummy and daddy to play and explore. Watching mummy typing on her laptop is not something Miss V endorses and with only 1-2 hours a day of alone time, after the housework is done and lunch is eaten, I am lucky to have enough time crumbs left to do one yoga pose or read a few pages of a book. 
And thus it is with a feeling of sadness that I have decided to say goodbye for now to my Greedy Gourmand. There are so many items on my 'to-do' list that I just can't justify spending the rather long time it takes to blog one entry, even if it's only once per month. Especially as I have decided to try to home school Miss V myself for the first 6 years of her life, and as with anything I do, I want to give it my everything and make it as enriching and fun for her as possible. Needless to say, my plate will certainly be full.

I don't want to say 'Goodbye for good' as who knows what the future holds as I do very much hope to return one day.

But for now, I wish all my treasured readers days filled with fine weather, fantastic company and most of all, fabulous food.


Wednesday, September 5, 2012

Chocolate, pear & vanilla tart


One year has passed since I held my daughter for the very first time.
One year since I became a mother and learned the real meaning of true love.
One year filled with more happiness, fatigue, love and amazement than the twenty five before it.
For me, this year has passed much too fast.

Each day I try my best to lock every moment I spend with her safely in the vault of my heart. For I know that soon, the particular squeal she makes when I 'find her' will disappear. And the way she smiles so proudly as she hands me whatever crumb, coin, paper remnant she has found on the floor will soon fade away. For she will never be as young as she is today, and with each day that she changes, some things are lost to make way for the new.

But today, which never held any significance to me,  is now so utterly precious since it became the day my daughter was born.

Although you will not read this dearest daughter, I want to wish you a wonderful birthday. I wish that life will give you more happy birthdays than you can dream of, each one more magical than the last. I wish that I will be there to share them with you and to help you blow out your candles until you can do it yourself. And most of all, I wish that one day, you will love someone as much as I love you.

Happy Birthday Valentine
xx


Wednesday, November 16, 2011

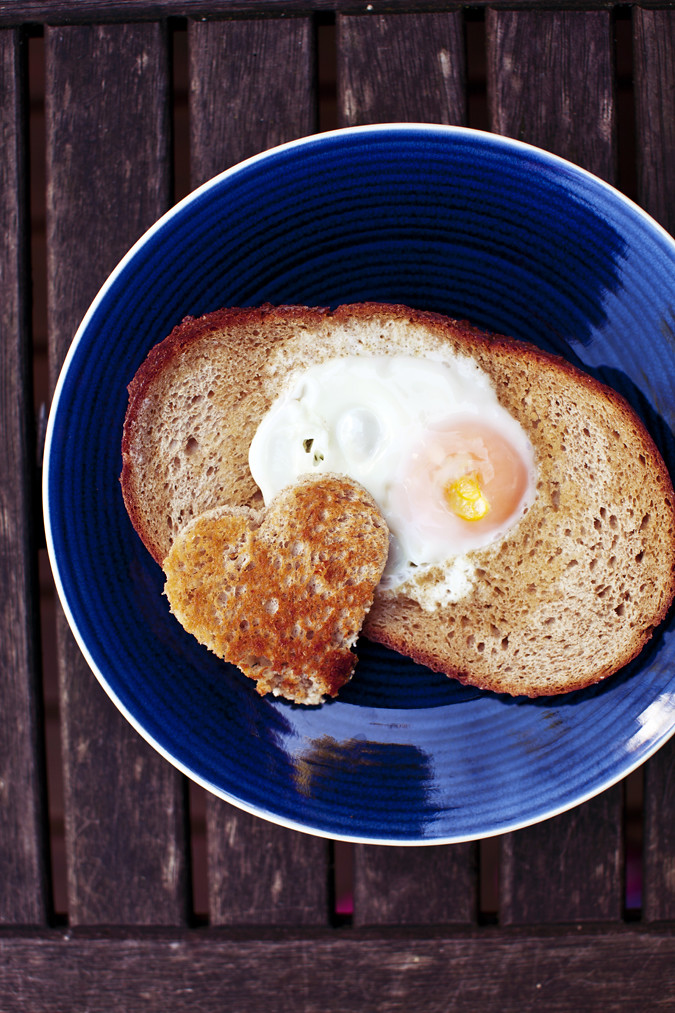
Egg in the basket


Some mornings find me with fresh eyes and a spring in my step, others have to beat through the cobweb of sleep with fists of savage sunshine and splashes of water so cold that I can feel each pore contract with a shiver. Today I was not only woken by sharp rays of light but also by my child's tiny hands as they kindly, and exuberantly, slapped me awake...and then slapped me some more for good measure. It's days like these I need a 'pick-me-up' breakfast; something cheerful, filling and most of all EASY.

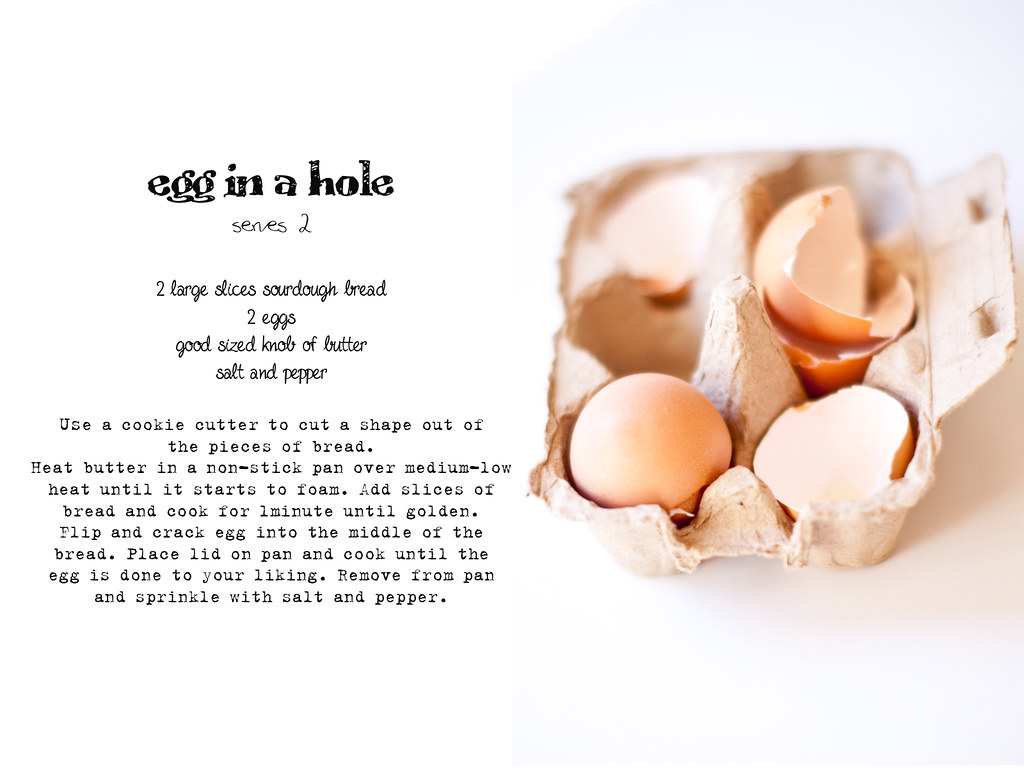
My great-grandmother hailed from Britain, and this meal was something she made for my mother, and in turn, what my mother made for me. We refer to it as Egg in the basket, but I think it's more commonly known as Egg in a hole. I attempted to use my artistic licence by creating a heart-shaped hole, however my generously sized eggs overflowed and hid the heart beneath their egg-white hems.

To make this simple dish a little more 'top drawer', I sprinkled it with truffle salt which is, in my opinion, truly meant to be paired with the humble egg.


(For a gluten-free dish use gluten-free bread, pictured above is wholemeal sourdough spelt).

Monday, November 7, 2011

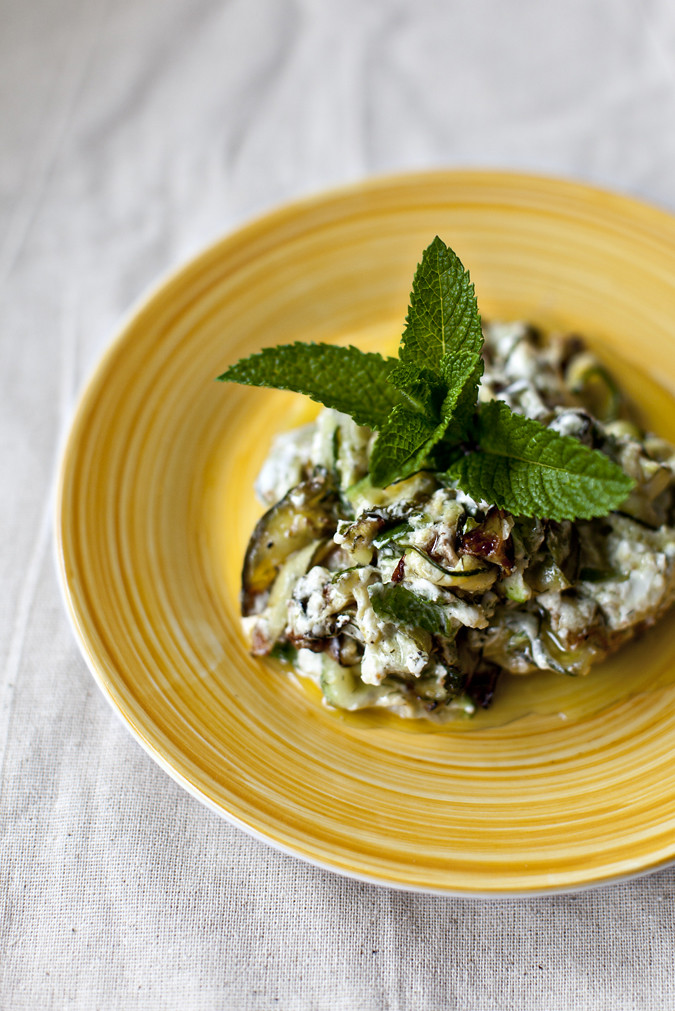
Zucchini with herbs & goat's cheese


Too many moons have passed since my last post, and this time a tiny child is not to blame. After two faithful years my trusty laptop began to struggle with the vigorous tasks of photo and video editing. Programs like Photoshop and Vimeo became too much to bear so I had to say my farewell and welcome a new addition to my life. Whilst I was methodically searching the online marketplace my darling husband was doing the same and surprised me with an early birthday gift. To his credit my new black beauty (yes, I decided to name it after my favourite dessert, la bete noire) not only satisfied my 'specs' criteria but actually exceeded them, and despite its heaviness (just over 4kg, but with my newly acquired mummy arm-strength, it's fine with me) I am head over heels in love with it. What sold me? I was running actions that would cause my former-laptop to crash in one second! Click and hey presto, action complete. Ah, twas love at first edit...

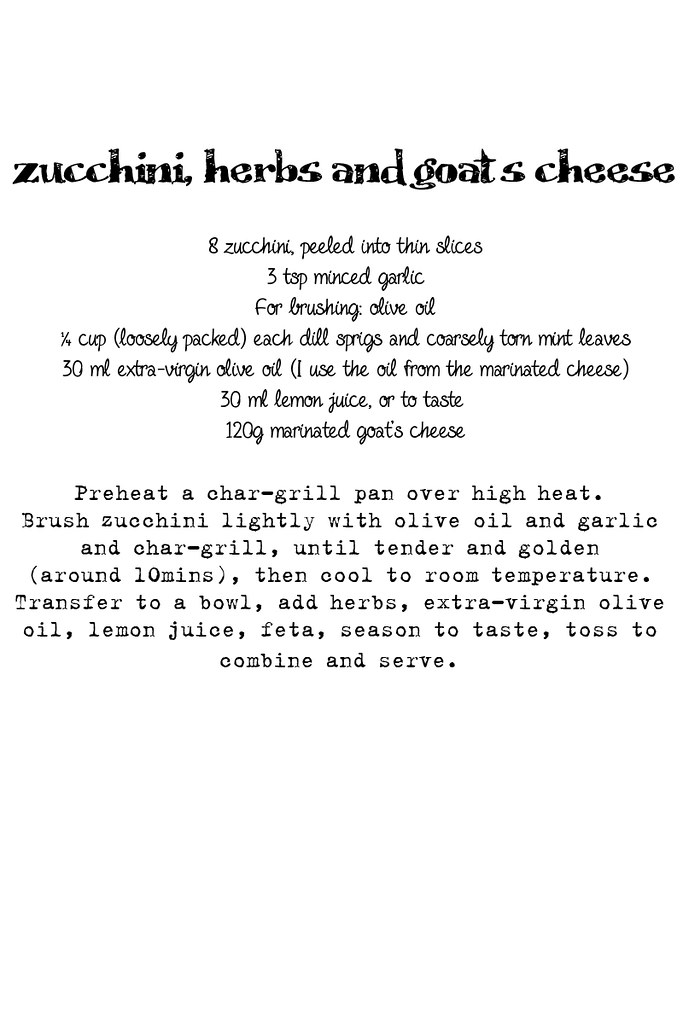
So once again I will hopefully be back to my regular weekly posts. I am also contemplating spending more time on the photography-styling aspect, but of course, that depends on whether baby permits. In the mean time, please enjoy this easy, summer side dish in which the humble zucchini stars. I forgot to measure whilst throwing it together so the recipe is more like a 'guideline', feel free to ad lib :)


ease: 4.5/5.
prep time: 8mins.
cooking time: 10mins.
total: 18mins.

taste: 4/5. Best way to get zucchini into the husband.

The zucchini in this dish is a mere whisper on a breeze, so even those who object to its subtle taste should find no reason to grumble here. The creamy goat's cheese offers tangy-ness to the sweetness of the garlic, coolness of the mint and grassy anise of the dill. Hubby actually requests this side dish.
If you'd like some crunch I recommend adding toasted pine nuts.

would I make it again: Yes.

Monday, March 1, 2010

Peach, Jamón ibérico & Buffalo Mozzarella Salad with Rocket & Balsamic


Sometimes the simplest is best.

Inspiration can be found anywhere.
I am particularly susceptible to inspiration's charms. I find my mind is easily tickled and spun into a carousel of ideas and thoughts by something so simple as a dandelion dancing on the breeze's toes, or in this instance, the satisfied grin of my husband after eating a salad at a restaurant. From that one meal, he discovered a new food, a new taste that tickled his tongue - Jamón ibérico.

This inspired me to find some myself so that I could create my own simple salad with it. Surprisingly, I found it on my third stop at a local Jones the Grocer store.
There are three grades, which I found out after the purchase, so I am not sure which grade it was, but suffice to say, hubby was pleasantly surprised to find it on his plate.
The original salad was comprised of Jamón ibérico, black fig, sweet rocket, hazelnut vinaigrette & balsamic jelly, but seeing as though we wanted a short break from figs (our mother in law kindly donated a bag of them from her garden), I thought I'd use some peaches before they disappear for another 9months.


Peach, Jamón ibérico & Buffalo Mozzarella salad
serves 4 as a side dish

50gm rocket, rinsed and dried
2 peaches, sliced into 8
6-8 slices of Jamón ibérico
250g buffalo mozzarella, torn (burrata would also be lovely)
1/2 lemon, juice only
balsamic reduction and olive oil to drizzle
salt and pepper to season

Slice peaches and toss with lemon, olive oil and salt and pepper. Rinse and dry rocket and scatter on plates. Arrange Jamón ibérico, peaches, mozzarella on plate and drizzle balsamic. Serve.

ease: 5/5.
prep time: 10mins.
total: 10mins.

taste: 4.5/5. Second-serving-scrumptious.

Hubby liked this so much he had a second serving of it.
This is all about quality ingredients so don't scrimp.
The peaches are luscious and add freshness to the peppery rocket and soft, creamy buffalo mozzarella whilst the balsamic adds sweet tanginess without overpowering the subtle but rich Jamón ibérico.

would I make it again: Yes, I'd definitely continue to play around with the flavours a little.

Wednesday, February 10, 2010

Sofia's Kitchen - Thia Ourania's Baklava

This week we had a guest cook, our dear Thia Ourania, and she generously made her Bakalava for us to greedily scoff down.

Ingredients:
500g crushed walnuts
2 tbls castor sugar
2 tbls bread crumbs
1 tbls cinnamon
250g unsalted butter
2 tbls salted butter
1 pkt filo pastry (Brand Antonio)

Syrup:

2 cups water
1½ cups castor sugar
  
Method:
Preheat oven to 180C.

Melt butters and set aside to cool slightly.

Mix walnuts, bread crumbs, sugar and cinnamon in a bowl.

Prepare square or rectangle tepsi by brushing base with melted butter. Place one sheet of filo onto base and butter filo, repeat this process with 5 sheets of filo. Sprinkle nut mixture evenly over filo (aprox 4-5 tbls) and then place another sheet of filo, butter and repeat process. Use 2 sheets of filo in between nut mixture layers, remember to butter each sheet of filo. Repeat this process until you have the last 5 sheets of filo for the top layer. Finish the top layer with buttering each sheet including the top layer. Splatter water over the top as well to help the pastry flake up when cooked.

Using a sharp knife cut through the layers of filo with rows aprox 5 cm apart and then again diagnally to create diamond shape pieces.

Place tepsi into pre heated oven and cook until golden brown.

Place sugar and water into a pan and boil until sugar has disolved, allow to simmer until liquid has reduced by half and syrup slowly drips of a spoon. You can add some lemon juice to liquid at this stage if you prefer.

Once cooked allow baklava to cool completely before pouring the hot syrup over the top.

**alternative ingredients – replace walnuts with pistachio or hazelnuts and add rosewater to syrup instead of lemon for a more fragrant result

Monday, February 8, 2010

Sofia's Kitchen - Perishkia


Another instalment of Sofia's Kitchen.

Up first are the deeply satisfying and addictive Perishkia. After eating seven of these yesterday I am still craving them.
We filled most with the spiced potato, but we also made some with cinnamon lamb mince and some with anchovy (dotted with red food dye).

Perishkia (Greek Russian Potato Dumplings)

INGREDIENTS:

DOUGH
1 KILO               PLAIN FLOUR
1 TBL               DRY YEAST
1 TBL               SALT
2 TBLS              OIL
1               EGG
WARM WATER

FILLING
3-4               POTATOES
2               ONIONS
2              GARLIC CLOVES
1 TSP              PAPRIKA
SALT & PEPPER

SIFT FLOUR IN BOWL, SPRINKLE YEAST AND SALT OVER FLOUR AND COMBINE DRY INGREDIENTS.  MAKE A WELL IN THE MIDDLE OF FLOUR AND ADD THE OIL AND EGG.  MIX BY HAND TILL INGREDIENTS ARE COMBINED AND GRADUALLY ADD WARM WATER AS YOU CONTINUE TO MIX TO PRODUCE A SOFT AND FLUFFY DOUGH.  COVER WITH CLING WRAP AND KEEP WARM (EITHER IN A SINK OF HOT WATER OR COVERED IN A BLANKET) TILL DOUGH DOUBLES IN SIZE.

WHILE DOUGH IS RISING MAKE THE FILLING.  PEEL AND CHOP POTATOS AND BOIL TILL COOKED THEN DRAIN.  IN A PAN SAUTE ONIONS AND GARLIC ANDTHEN ADD THE PAPRIKA.  MASH POTATOES AND THEN ADD THE ONION MIXTURE AND SALT AND PEPPER TO TASTE – MIX WELL.

ONCE DOUGH IS READY, CUT INTO SMALL BALLS (A LITTLE LARGER THAN A GOLF BALL).  FLOUR THE SURFACE AND ROLL OUT THE DOUGH, PLACE A TABLESPOON OF THE POTATO MIXTURE IN THE MIDDLE AND FOLD OVER PINCHING EDGES CLOSED.  PLACE ON BAKING PAPER TILL READY TO COOK.

HEAT OIL IN A DEEP PAN AND FRY DUMPLINGS TURNING ONCE TILL GOLDEN BROWN.  DRAIN ON PAPER TOWEL AND SERVE HOT OR COLD.

Wednesday, January 20, 2010

Sofia's Kitchen - Coconut petit fours


Apologies for the lack of posts, but trying to organise an overseas holiday in a few days is tough stuff.
But no fear, I will be back next Thursday, and until then, here is the latest installment of Sofia's Kitchen.

Akin to a coconut macaroon, but with a touch more flair.

Coconut Petit Fours
makes 30+

ingredients:
500G  castor sugar
500G  shredded coconut
9 TBLS melted unsalted butter
9 TBLS  self raising flour
9  eggs (small)
1 packet vanilla sugar
glazed cherries, halved


method:

Pre heat oven to 170C

Place sugar in a bowl and add the eggs one at a time beating well.  Beat mixture until light and fluffy.
Add vanilla sugar and melted butter to mixture and beat until combined.  Now put the mixer down and get ready to use your hands!

Add the shredded coconut, and flour and mix well with your hand making sure all ingredients are well combined.  Let mixture sit a little bit for the dry ingredients to absorb the wet.  The mixture should stick to a spoon.  If too watery you can a little more flour and coconut.

Place baking paper down on flat trays and scoop tablespoons of the mixture onto the trays allowing enough room for some spreading.  Place a glazed cherry on top and place into oven until they turn a light golden brown.

Petifours should have a crisp outside with a chewy moist centre.

Tuesday, November 17, 2009

Karithopita - Walnut Cake


This is the 3rd installment of Sofia's Kitchen.

This spongy, nut studded cake, lovingly doused in a vanilla sugar syrup and then cut into a diamond shape, is perfect which a cup of Greek coffee. (Recipe transcribed by Helen)

INGREDIENTS

2 ½ CUPS SELF RAISING FLOUR

2 CUPS CRUSHED WALNUTS

1 CUP SUGAR

250G UNSLATED BUTTER (ROOM TEMPERATURE)

6 EGGS

SYRUP

2 CUPS SUGAR

3 CUPS WATER

1 TSP VANILLA SUGAR

    LEMON JUICE

BEAT SUGAR AND BUTTER TILL CREAMY. ADD EGGS ONE AT A TIME AND BEAT TILL WELL MIXED BEWTEEN EACH EGG. SIFT FLOUR IN TO MIXTURE AND FOLD THROUGH, THEN ADD WALNUTS AND FOLD THOUGH TILL ALL INGREDIENTS ARE WELL MIXED. POUR BATTER IN TO A GREASED 30-35CM TEPSI AND COOK FOR 30-40 MIN OR UNTIL GOLDEN BROWN.

WHILE CAKE IS COOKING MAKE SYRUP. PLACE ALL INGREDIENTS INTO A SAUCEPAN AND HEAT UNTIL SUGAR DISOLVED. SQUEEZE ½ A LEMON JUICE INTO SYRUP AND SET ASIDE TO COOL.

ONCE CAKE HAS COOKED POUR COOL SYRUP OVER THE TOP, MAKING SURE ALL PARTS OF THE CAKE ARE COVERED. LET SIT TILL ALL SYRUP HAS BEEN ABSORBED BEFORE SERVING!

Wednesday, October 7, 2009

Sofia's Kitchen - Greek Doughnuts (Tsirihta- Pontian)


Here we are again, for installment #2 of Sofia's Kitchen.

The first half of the day we made delicious, crispy doughnuts with a fluffy doughy center soaked in a lovely sweet syrup. You can play around with the syrup, perhaps a rosewater syrup with a sprinkling of pistachios, or even perhaps skip the syrup altogether and just roll them in a cinnamon sugar. Sometimes we also add a sprinkling of walnuts and cinnamon. A word of warning; these are addictive, ask my husband who scoffed down five whilst I had me head turned.

Tsirihta (Greek Doughnuts)
makes around 30

2 cups plain flour
1 tbs dry yeast
1 tsp salt
1 tsp sugar
1 ¾ cup water
olive oil - for deep frying
sesame seeds – dry roasted

SYRUP:
200g honey
½ cup sugar
2 cups water

Place all dry ingredients in a large bowl and mix to combine. Gradually add the water to mixture and whisk to make a smooth batter. Batter should be slippery but cohesive. Cover bowl with glad wrap and place in the sink filled half way up the bowl with hot water. The heat will help the batter rise. Once batter has risen to double its original size, re whisk to combine all ingredients.

Heat oil in a deep frying pan. Make sure oil is hot. Dip tablespoon in a cup of oil (to avoid batter from sticking to spoon) and scoop a portion of the batter and drop into hot oil. Continue this process allowing enough room in the pan for them to float around without sticking together. Turn donuts over once golden brown. Remove with a perforated spoon when golden brown on both sides and place into a bowl with paper towel to absorb the oil.

Make syrup by adding all ingredients into a pot and boil till sugar has dissolved and mixture has thickened slightly. Make sure syrup isn’t too watery as will not stick to the donuts properly. Drop the cooled donuts into the hot syrup mixture 3-4 at a time and toss around to coat all sides. Remove and place onto the serving dish. Sprinkle with sesame seeds and ENJOY!

Monday, September 14, 2009

Sofia's Kitchen - Coconut rice fingers


Yesterday was a wonderful day for many reasons.

I got to see my grandmother after her return from her 3 month holiday in Greece. I also got to catch up with my beloved aunts, uncles and cousins. But most importantly I got to watch and eat the results of my grandmother's recipe. For the first day of a new tradition, it really was wonderful.

We started off Sofia's Kitchen, installment 1, with a delicious sweet treat from her past in Greece.
Coconut rice fingers are finger long tubes of crisp filo pastry filled with unctuous, coconut rice as creamy as creamy can be which are then drizzled with a sticky lemon sugar syrup before being dusted with snowflakes of dessicated coconut. Sweet but not overly so, perfect portions that leave you licking your fingers with glee.

The story behind the dessert, retold my Aunt Helen:

Mum was in the city with a friend (Evlambia) and bought a dessert from the Zaharaplastio (Sweets Store).. liking the dessert she purchased, she asked the baker how he made it – he replied he could not tell her as it was a secret.. is that so my mother thought, determined to find out how it was made she started to decipher what ingredients were used as she continued to eat the dessert. She came home and made the dessert according to how she thought it was done and what she thought the ingredients were according to her taste buds.. right or wrong – her taste buds came up with a wonderful recipe.. one we all love and enjoy and call Coconut rice fingers. This original recipe of mums will continue to live on from generation to generation, as on Sunday 13th September 2009, we all had the privilege of mum showing us how it was done, which was recorded and noted done for future reference.

With my gorgeous, little Yia Yia Sofia.

Coconut rice fingers

makes around 25

INGREDIENTS: (you may have left over rice depending on how many filo sheets there are in your packet)
1 cup medium grain rice
4 cups water
pinch salt
1 cup milk
¾ cup white sugar
2 tsp vanilla sugar
1 cup desiccated coconut (also extra 1 cup later for topping)
1 packet filo pastry
250G unsalted butter

SYRUP:
1 cup white sugar
1 cup water
1/2 lemon juice and peel


Preheat oven to 200C fan forced.

Melt butter in pan and place aside till needed.

Rinse rice until water runs clear and boil in water with a pinch of salt over medium heat. Once water has reduced to about half the consistency, add milk and boil a little more. Add sugar, vanilla sugar and 2 tablespoons of the melted butter and mix well. Add the coconut and mix well. Using a potato masher, mash the mixture until rice is blended with all other ingredients. Take off stove and set aside to cool.

Open filo pastry out on a bench and cut down the centre vertically, to make two parts. Brush two sheets with the melted butter and lay on top of one another. Cover rest of filo with damp cloth until required. Place one heaped tablespoon of the cooled rice mixture at one end of the filo and roll like a cigar until mixture covered, fold the edges in to avoid the rice mixture spilling out and continue to roll till the end of the pastry. Place on a lightly buttered tepsi (large round tray with 3cm edge). Continue this until all the filo pastry is used. Should fill one 40cm tepsi, approximately 25 fingers. Place in preheated oven for 15-20min or until golden brown in color.

While the fingers are cooking, make your syrup by boiling the sugar and water until the sugar dissolves. Once boiled and water reduced add the lemon juice and the rind and boil until liquid thickens to a watery honey consistency. Set aside to cool.

Once fingers are golden in color, take out of oven and immediately drizzle syrup over each finger with a tablespoon (syrup should be cool). Sprinkle coconut on top of fingers as syrup is being absorbed. Serve once have cooled down.

Monday, August 31, 2009

Sofia's halva


Tastes from our childhood become such an integral part of who we are.

Foods that we loved as children, especially if made by someone we love, fill us with a deep memory-based happiness in our adult lives upon eating them again. As much as I can love a dish I have made now, it will never compete against delicacies like my grandmother's lentil soup (Faki), my mother's chicken parmigiana (when I used to eat meat, I could have eaten this every day) or store-bought Pfeffernüsse gingerbread biscuits given to me each time I visited my Nanna and Great Nanna.

If I had to pick just one childhood treat, it would have to be my Yia yia's (Sofia) semolina Halva. She would put them into these little lego-coloured bumpy moulds and I could not stop at just one - ever. The most I had in one sitting was four, and for a 6 year old matchstick thin little girl, that was enough to make my stomach stretch to an unheard of size. My favourite place to eat them was in the homemade swing of a large, tiger striped blanket tied to two large tree boughs - my secret spot with my delicious treasure, absolute bliss.

However, one child's heaven-sent treat may most likely not be as appreciated by others who do not have the childhood memories attached. Whilst I love Halva, Ryan doesn't care for it, just as I don't care for his concoction of pasta with chicken stock and Kraft cheese singles. But there are those times when a person can enjoy someone else's childhood feast (just like I did with Ryan's grandmother's Ftira). So I can only suggest to give it a try, you might like it almost as much as I do.


Sofia's (Yia yia's) Semolina Halva
serves 8 -12

Syrup
2 cups sugar
4 cups water

Halva
1 cup oil
2 cups coarse semolina (I used fine, and it still worked out)
1/2 cup sultanas
1tsp cardamom
cinnamon to sprinkle on top
crushed walnuts to sprinkle on top ( or fold through if you prefer)

Place sugar and water in a saucepan and over medium heat stir until sugar has dissolved. Set aside.

In a larger saucepan heat oil. Drop one piece of lemon peel into oil to test temperature and then discard lemon peel. Pour semolina into oil and stir until semolina is lightly browned (NOTE: I have been told by my aunt that the semolina should be browned further, more towards brown sugar in colour).
Add sugar syrup gradually - BE EXTREMELY CAREFUL as syrup with cause the semolina to sputter. Continue until all the syrup has been mixed into the semolina and turn off the heat. Stir through cardamom and sultanas and pour semolina into a mould/s of your choice. Let them set for at least 5 mins and then turn out onto a plate whilst the semolina is still warm.
Sprinkle with cinnamon and walnuts. Enjoy.

ease: 5/5.
prep time:
1min to get ingredients.
cooking time: 14mins - make semolina whilst making sugar syrup.
total: 15mins.

taste: 5/5 (I am biased on this one). What can I say? Aromatic cinnamon and cardamom give way to a vanilla-esque semolina with plump, tartly sweet sultanas and then crunchy walnuts. Each bite reminds me of childhood joy and my grandmother.

would I make it again: Yes.

Sunday, December 14, 2008

Mum's chicken parmigiana with basil tomato fries


Do you ever have one of those days when everything is going perfectly and you just feel happy? I was having one of those days today; I was getting a lot of things done, spending quality time with my partner and our dog and just overall was in a great mood.

I was carrying a load of laundry downstairs when my gaze was diverted to the lemon tree/lavender area as a bird flapped its wings while launching itself from the rose trellis. I was about to turn my head when I noticed a white flutter, like a mirror reflecting the sun light. Putting down my laundry I raced upstairs to get my camera in case it was a cool looking insect. And just my luck, an absolutely gorgeous butterfly was having a rest on my dried up lavender buds. I tried to snap some shots, zooming in as much as possible with my point-and-shoot so as not to frighten away the little darling. Suffice to say I think I got a few decent shots in - it's times like these I wish I had some better equipment though, and a tripod.


4 chicken breasts
2 eggs
1/2 cup flour
salt and pepper
1/2tsp garlic minced
1/2tsp minced ginger
1tsp Italian mixed herbs
2cups breadcrumbs
1cup cornflake breadcrumbs
1tbs season all salt
1tsp paprika

Cut fillets in half and flatten slightly. Dust in flour, salt and pepper.
Whisk eggs with garlic, ginger and Italian herbs. Dip chicken in egg mixture.
Combine both breadcrumbs, season all and paprika in a large plastic sealable bag. Put chicken in bag, seal up and toss to coat.
In a large fry pan heat 1/4 cup of oil and 1tbs of butter over medium heat. Add chicken and cook for 10mins or until golden brown on both sides. Transfer chicken to a baking tray lined with foil.
Spread 2tbs of any tomato sauce over the top and of the chicken and then sprinkled a handful or so of mozzarella cheese. Put under grill until cheese has melted. Serves 4.

ease: 4.5/5. You have to flour, egg, crumb, fry and then grill the chicken.
prep time: 15mins - 10mins for fries and 5mins for chicken.
cooking time: 45mins for fries, chicken takes 10mins in the pan and then 3mins under the grill.
total: 1hour.

taste: 5/5 for the chicken parmigiana. I added 1tsp of garlic as I like more garlic and I think I'll leave out the ginger next time, I have a feeling my mum just added it recently because I never tasted ginger in the chicken parmigiana I ate as a kid. I halved the amount of breadcrumbs - I only used Krispy breadcrumbs which are lightly seasoned and slightly crispy. This was my absolute favourite dish as a kid which is why I kept eating chicken after I decided to become a vegetarian at 9, I couldn't resist mum's chicken parmigiana.
4/5 for the fries, I tripled the garlic powder and doubled the Parmesan which was probably mistake as it melted and made all of the chips stick to the foil making it hard to take them off whole.

would I make it again: Yes for both - everyone enjoyed dinner.

recipe: http://www.loveandoliveoil.com/2008/11/baked-parmesan-basil-fries.html

Saturday, August 23, 2008

Dad's Pumpkin Soup


Dad brought over a pumpkin soup he made, and although I was skeptical, it was really yummy - nice and creamy and not overpowering. Good job Daddy.
He has also brought over a couple of his Tiramisu desserts - also very delish. I shall take a pic the next time around.